Being able to solder and desolder a keyboard is a valuable skill that can translate into lots of other areas in your life. A soldering iron is an amazing and under-appreciated tool for any keyboard or computer enthusiast or anyone with an interest in electronics for that matter.
Most of us don’t ever learn how to use a soldering iron. It’s not part of the common school curriculum in most places. Speaking from personal experience, we had to elect to study electronics at high school. Even then, we only studied it for about 3 months.
You can only just cover the basics in 3 months. Luckily for me, and therefor for you, you only need to understand the very basics to learn how to solder and desolder keyboard switches.
This post contains affiliate links
This article is going to give you all the information you need to feel confident in your abilities to solder your keyboard, or any circuit board, and do so safely. This article will also cover what a soldering iron is, how solder works, how to desolder correctly, and anything else you might need to know.
If you haven’t used a soldering iron before it can feel very overwhelming jumping right into it. It can also be dangerous, soldering irons get very, very, hot. Luckily, the chances of you hurting yourself are surprisingly low.
Even as kids in high school the only injuries the soldering irons caused were done so by people fencing using them as burning swords. So unless you plan on using them as fencing too you’ll probably be just fine. Here is everything you need to know about soldering and desoldering keyboard switches.
Table of Contents
What is solder?
Solder is an alloy metal. Typically a blend of tin and lead. Though it can sometimes be made of brass or silver. You will probably be using exclusively tin alloy for your keyboard, as that’s all that is required.
The reason tin is used is because it has quite a low melting point. It is still relatively high as it’s a metal, but as metals go it’s about as low as can go. This makes it extremely workable yet durable and strong. Perfect for our needs.
Solder is designed to easily be transformed into its “liquid” state through the use of a soldering iron. We will get into what a soldering iron is and how it works in the next section. For now, all you need to know is that it heats the solder.
When the solder is hot, it becomes a very “goopy” thick liquid. This means you can move it around and position it very easily. It cools quickly, meaning you can work quite quickly too. But, it also heats back up and becomes usable again very quickly so don’t feel the need to rush yourself.
Plenty of options for solder available at Amazon
What is a soldering iron?
A soldering iron is the magic wand of soldering. It is typically a thin metal rod that is hooked up to a power supply, this power supply is the source of the heat of the iron. Of course, you will generally find that there is a rubber sleeve over the metal rod so that you can comfortably hold it. As it will get quite hot.
You should find it comfortable enough to hold the iron with the rubber sleeve, only the bottom end of the soldering iron stays hot. Sometimes the iron itself is hooked up to a power supply. Sometimes the iron is heated by leaving it inside a metal coil that is instead hooked up to a power supply. Either is fine.
I like to use one that is heated up by a coil because then you aren’t dragging a cable around with you. But that’s just personal preference. You are genuinely fine to use any kind of soldering iron you like.
The very tip of the iron gets very hot, hot enough to melt metal, so you must be very careful. I know this has been brought up a few times already, but burning yourself with a soldering iron isn’t fun. They tend to leave little scars wherever they burn.
I haven’t been to high school in years and I still have a few reminders of my electronics lessons in the shape of solder burns on my arms. Now, most soldering irons are made of copper, so they conduct the heat very well. You will find that the tips of the iron are generally plated with iron to increase the durability of the iron.

This little kit from Amazon is great, it’s a cabled iron that has a coil to wrest it in. It is not heated by the coil. You can find the kit here.
What is solder used for?
Solder is mostly used for components on a PCB (printed circuit board). This circuit board is the brain of whatever device you are using. With a keyboard, it typically regulates the flow of electricity and settings, but most importantly is how the keyboard, and the computer, register the keys have been pressed.
Now, circuit boards are just that. Circuits. They provide the circuitry for all of your components. A circuit board generally has a few of the same components no matter what it’s purpose. Resisters, transistors, switches, and delays.
These small components fit into the circuit board quite easily. But here’s the catch, they must be positioned very precisely. If you look at a PCB, you will notice that you can’t just stick a resister anywhere and expect it to do anything.
Unfortunately, PCBs don’t work like Lego. You can’t just clip them in, they need to be fused to the board. Fused with liquid solder with the help of a soldering iron, to be specific. Solder is highly conductive of electricity, which means the components can all receive a steady flow of power.
Here is an article by sparkfun.com that covers in detail how a printed circuit board works and gives a clear idea of what they look like. Also how that corresponds to their components and how those components must be attached.
It’s pretty easy to wrap your head around, so I would encourage you to give that article a once over. This will increase your odds of successfully soldering your keyboard without damaging any of the delicate components.
What are the dangers of solder to me and the keyboard?
Soldering is only as dangerous as you make it. If you are very careful, you will be just fine. But there are some risks to be aware of. Luckily, being aware of them is probably enough to avoid them entirely.
First, we will cover your safety. Soldering irons get very hot, your hands will be fine when you are holding it but you will burn yourself if you touch the end. This seems obvious, and it is, but it’s still worth noting. If you are using one hand to hold the components in place and the other to solder them, you will need to be careful that you don’t poke yourself or push liquid metal onto your finger. It will take off your skin.
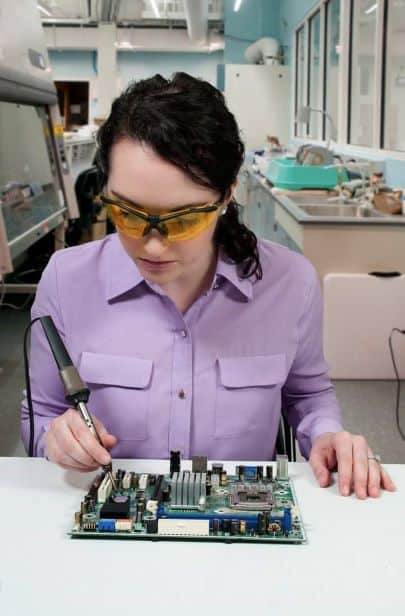
It’s also a good idea to wear goggles. The smoke and fumes that come off the solder can be painful for your eyes. It’s just an easy safety measure you can take. Goggles are always good.
The following is an image of a woman incorrectly holding a soldering iron. This is very dangerous and if she was actually using it she would have some pretty nasty burns. Here is a link to some more cringy images of incorrectly using electrical equipment.
You are not the only thing that needs to be taken care of. The circuit board is very delicate, it’s sturdy enough to shrug off some bumps and knocks but if you are overly rough with it you will damage it.
Components on the circuit board tend to have two very thin wires, these wires are what gets soldered to the board. It’s possible to break these off if you aren’t gentle enough. The circuit board is pretty heat resistant, but if you leave a hot soldering iron on it you will burn through it.
Lastly, you will also want to ensure you always use the heat wrest for the iron. The heat wrests gives you somewhere to safely store the iron when you aren’t using it. If you just leave it on your kitchen table, you’re going to burn your table.
In case you haven’t noticed, the common theme of risks with a soldering iron is that it tends to burn things. You, the tablecloth, the circuit board, itself if it gets too hot. So long as you respect the iron you’ll be fine.
Why might we want to solder our keyboard?
Why one might want to solder the keyboard is not always clear to somebody who hasn’t done it before. Here are just a few reasons I can think off the top of my head:
- Existing solders have worn down.
- It just gets broken down over time.
- The keyboard overheats and the components shift slightly.
- The keyboard gets dropped and needs realigning.
- You just need to switch out the switches themselves!
Most keyboards rely on a set of switches attached to the circuit board. With a mechanical keyboard, a mechanical switch is flicked whenever you press a key down. The switch flicks down and connects with the corresponding circuit board component.
Most keyboard circuit boards have a lot of components in tight rows, these are directly under the switches. With membrane keyboards, you will often find that one long plate with dozens of pressure pads that fit directly between the keys and the circuit board.
If they become even slightly misaligned they won’t work at all, which means you will have to move them back into place. And hold them there. To do that you’ll need to re-solder the switches back into place.
You could pay someone to do it for you, but that’s a waste of money in my opinion. Why pay someone else to do it when you can just do it yourself? A soldering iron is cheap (as you’ve seen above) solder is cheap too. So why not do it yourself?
How to Solder and Desolder Keyboard Switches
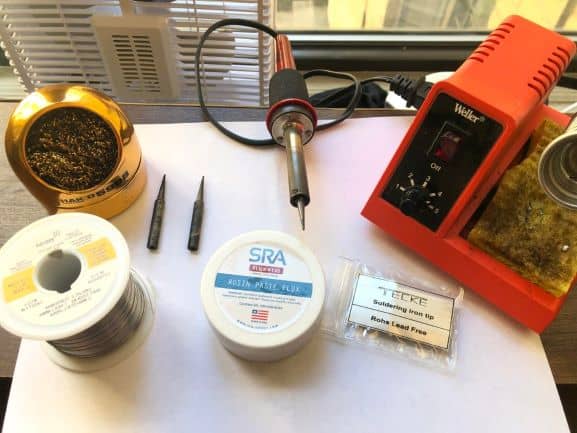
The tools needed for the job
Luckily, soldering pretty much only requires a soldering iron and some solder. Perhaps some goggles too for the reasons we went into earlier. I would also suggest some kitchen paper towel, or preferably jay cloth.

Safety first! Great price on these at Amazon
Soldering can leave your circuit board a little messy. At least it will when you are just starting. This is not a technical issue, rather than an aesthetic one. Leaving solder all over the board won’t make it stop working but it will look ugly.
It could cause issues if you somehow managed to solder a bridge from one component to another that bypasses some of the board circuitry. When the solder is hot, it’s possible to wipe it away carefully. It’s easier to remove it with the iron. But we will get to that later.
You will also need a few tools for getting your keyboard apart. The keyboard needs to be taken apart completely to get proper access to the circuit board. To do this, you will need a set of screwdrivers of varying sizes and a switch clip depending on what type of keyboard you are working with.
You will also need bowls to store all the screws and switches in after you take them off the board. Otherwise, you will lose some. They are so small and there are so many that you are bound to lose track of at least one. If you lose one, the whole keyboard will become pointless. Would you keep using a keyboard that had an A key that doesn’t work at all? No.
How to take your keyboard apart
Taking your keyboard apart isn’t overly complicated. Most keyboards are held together by 6-12 screws. Once you remove these screws you’ll find that it’s quite easy to pull the keyboard apart. Keyboards are generally split into two pieces.
On top, we have the outer frame and the keys themselves. This part can be ignored, for now, if you want to clean them this would be the time, but otherwise, you’re good to move on. Now, we also have the back part of the frame and the switches.
These switches can be removed from the circuit board by simply taking them off. What we’re interested in is the switch components for the circuit board, not the actual mechanical switches themselves. These can be found all along with the circuit board. They will be labeled as switches, finding each switch is pretty easy. You’ll have no trouble there.
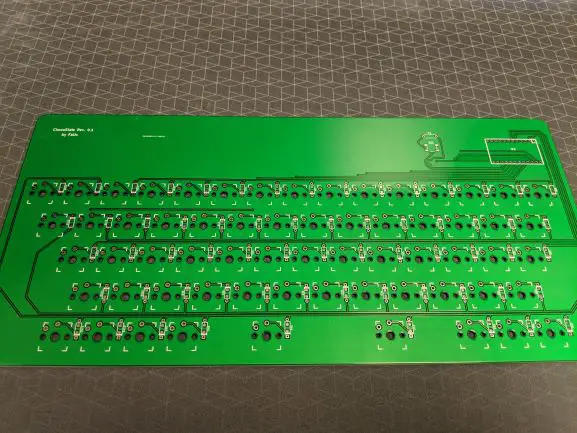
Just in case, here is an image of what a keyboard PCB should look like. This is just an example. You will notice that each keys corresponding switch is very clearly laid out.
How to unsolder your keyboard
Unsoldering your keyboard is pretty easy. You simply need to heat the existing solder with the iron, you can then remove it with tweezers. The best way to remove the existing solder is to heat a little bit of fresh solder and add it to the existing weld. This gives you a little bit of breathing room with your iron to heat the old solder without burning the circuit board or switch.
Once you have heated the solder into a liquid state, it’s fine to gently push it off the switch and onto the board itself. Carefully, so you don’t accidentally add it to another component. Once left alone the solder will cool and harden very quickly, once it’s solidified slightly you can easily pick it up and drop it in the trash can.
Repeat this step for every connection the switch has to the board, and then remove the switch and put it in a bowl close by. Don’t lose the switch!
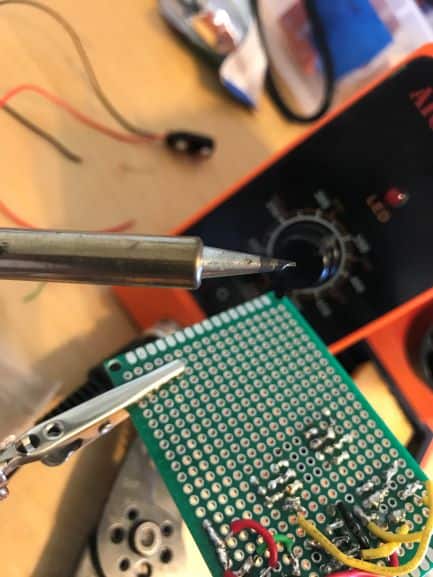
How to solder your keyboard
Soldering your keyboard is also a key part of desoldering it, as mentioned above you’ll need to add a little solder each time you remove existing ones. So it’s important to cover how to solder in the first place or else you’ll struggle with the desoldering.
Adding solder is quite easy. Solder typically comes in a very long thin strip of metal. Sort of like if you unbent a paper clip into one long metal wire. Here are the steps to soldering your own keyboard switches:
- Now, on one hand, you will want to hold the strip of solder, in your dominant hand the soldering iron.
- Hold the iron as close to the thing you want to solder as possible without touching it.
- Then gently push the end of the solder into the iron so it heats up and pools as a liquid at the end of the iron.
- Then remove the stick of the solder and gently touch the iron to the device.
- Push the stick of solder back into the iron gently, as it melts the liquid solder will plop onto the necessary joint.
- When you have added enough simply remove the stick of solder and the iron and allow it to cool.
Conclusion
Hopefully, you’ll now feel confident in your soldering abilities. It truly is quite easy, it looks harder than it is. With a little practice, you’ll be soldering like a pro in no time at all.
I’ve provided a bunch of resources and videos within this article, but here is another one that is quite good. The video is old but the info is good. You should give it a quick watch before you get started to give you a better reference.
My advice would be to buy a cheap circuit board from Amazon that you can practice soldering on first before you do it on your keyboard. Iron out any kinks that there might be in your abilities before you put your keyboard at risk.
Good luck soldering your keyboard, make sure you take your time and work methodically, and try not to burn yourself. Happy soldering!