Testing your keyboards PCB is a key step when you are making any customizations to your keyboard. The PCB is designed to be as resilient as possible, but, it’s also designed to be as cost-effective to manufacture as possible.
Luckily, they’ve managed to make a pretty good trade-off between cost-effectiveness and quality. But you still need to be careful.
This short article will cover everything you need to know about how to test a keyboard PCB, why you should do it, and how to make sure you don’t end up breaking it by accident.
Table of Contents
What is the PCB?
The PCB is the printed circuit board, it is the brain of the keyboard. Every electronic function the keyboard performs is done through, and with the help of, that main circuit board.
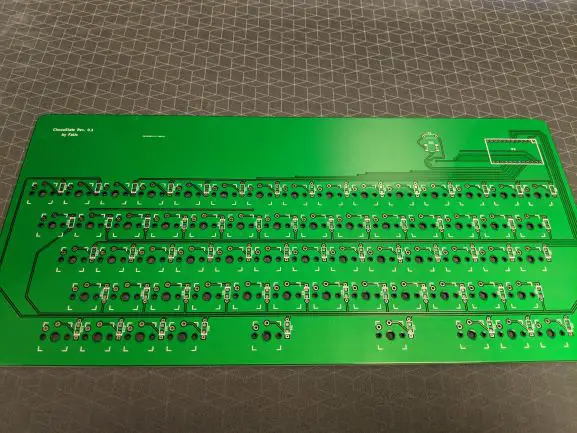
The PCB is typically green or pale orange, with circuitry, inbuilt into the board in the form of metallic colored “wires”. They are actually just conductors but that’s essentially how they work.
The PCB is also the most at-risk part of the keyboard. Sure, it may be reasonably well protected by the keyboards frame and the keys that sit on top of it. But there is also a direct link between the outside world and the circuitry itself.
Most keyboards work by having each key press a switch that connects directly to the circuit board which in turn tells the computer what keys you pressed. This means if you spill any food, drink, or anything else into your keyboard it can potentially end up directly on the circuit board. If you know anything about computers you should know that they don’t like it when you pour liquids on them.
Why would you need to test the PCB?
The only way to test that each key is working as it should is to test the PCB itself. You can run diagnostics on your keyboard through the control panel of your computer. But, that isn’t going to give you all the facts. So, you will need to test the keyboards PCB itself to make sure that each key registers as it should.
If you are checking because you are about to, or have already, been soldering. Then you will need to check every single key. If you are testing the keyboard in general you can probably get away with only doing some of them.
Sometimes If I take a keyboard apart, to clean it properly or just to check everything is in its proper place, I will regularly test a few keys around the keyboard. Not all of them. If you are going to have a problem unique to one key it is more than likely a problem you caused yourself when soldering.
You should also test your keyboard if it’s a brand new keyboard to make sure it works before your warranty expires. Here’s a fun one for you, taking the keyboard apart to check if it works correctly almost always voids the warranty. Good luck with that one!
What are you testing the PCB for?
So, we understand why we are testing the PCB, but what are we looking for when we test it? One of the major things we are looking for is current. Especially if you have been soldering. Or are about to solder.
The reason you check the current before you start soldering is to check if the components themselves are working. If you don’t test beforehand you might assume that your soldering was the problem when in reality it was the component itself all along. You would be soldering, desoldering, and re soldering for hours trying to make it work. A fruitless task.
If the components did work before you tried to resolder them, chances are you haven’t made a full connection. Which is no problem at all. Just add a little bit more solder to the connection and you should be good to go. Don’t overdo it, just make sure there is a full connection.
If you are confident in your connection but you are still getting an error when you test it you may have broken the prongs on the component. Either by pushing on them too hard, breaking them off, or burning them. The last one is pretty hard to do, but still possible.
How to test a keyboard PCB
Testing the keyboard is easier than you think. There are websites you can use to test that each key works properly. This website: https://www.keyboardtester.com/ is pretty great for that. It’s kind of a jokey website but still gets the job done.
To test the keys work you will first need to take the keyboard apart, unscrewing it the 6-12 major screws that hold the keyboard in place is self-explanatory.
Once you have taken the keyboard apart and have access to the PCB itself, you are going to be looking for two pressure pads that correspond to each key. Luckily, someone on Reddit posted a very handy photo of their PCB that clearly shows what I mean by pressure pads.
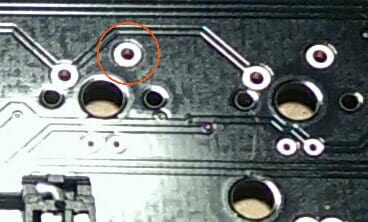
You will need to run that website on your computer and press down BOTH of those pressure pads at the same time. If it works, the website will highlight that key for you. If it doesn’t work, well, you’ll be able to tell quite easily. You will need to repeat this stage for every key if you have been soldering them all, so be prepared to spend a couple of hours on this.
Conclusion
So, now you know! Testing your PCB is super easy. If you’ve not done it before you might find it takes you a while to test it quickly, but there’s no harm in taking your time. Slow and steady is a good way of ensuring that you don’t break any parts of the PCB.
They’re pretty resilient, but try not to be too heavy-handed with them. If you do find a key doesn’t work, think back when the last time it was working is. If you are testing the keys using that website it should help you track the ones that you’ve already done.
It will also help you compare before and after tests. You can make a note by hand, but that’s even more tedious. Good luck with your keyboard, I hope everything works as it should, happy typing!