If you are having trouble with your keyboard, specifically the membrane of it, you may find that using said keyboard becomes very frustrating and overly tedious. A broken keyboard is a nightmare to deal with, especially if you are someone who uses it for eight hours a day five days a week. Maybe more.
Most of us aren’t quite as confident identifying the problem with a membrane keyboard as we would be a mechanical one because we have built them up to be more complicated in our heads. But that isn’t quite true.
If you need to fix the membrane on a keyboard, it’s important to identify the problem. The most common thing to be damaged is the thin metal wire conductor that transfers your input to the computer. Silver lacquer can be used to fix the issue as it is highly conductive. It only takes a little bit to bridge the broken conductor trace.
This article will cover what a membrane keyboard is, how it works, how it gets damaged, and even offers you some ways to help prevent further damage. It’s important to understand all of these things well as it will make the next, and most important section, far more manageable.
And lastly, of course, we will cover how to make some repairs to your membrane keyboard yourself – without having to shell out for expensive repairs from a computer repair store.
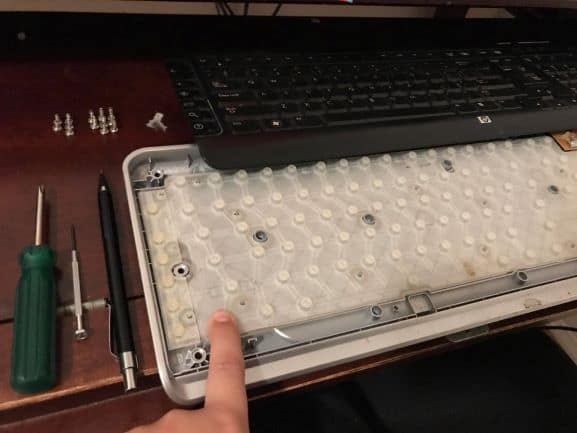
Image by: u/beanubeve
Table of Contents
What is a Membrane Keyboard?
A membrane keyboard is a very common type of keyboard, it is named for its membrane switchboard inside the keyboard’s frame. Whereas mechanical keyboards make use of individual mechanical switches for each key, the membrane keyboard uses one long membrane board that all of the keys fit into neatly.
Membrane keyboards are far slimmer than mechanical ones and far easier to produce. For these reasons they are generally found more often in laptop keyboards and as wireless keyboards. Their relatively easy manufacturing process compared to say a mechanical keyboard is a big reason why membrane keyboards are so much more affordable.
Membrane keyboards are generally a lot quieter than mechanical ones as they don’t produce a deafening “click-clack” as you type. Many people prefer this, office workspaces especially as they are much more considerate of other people.
If you are looking for a good keyboard to travel with, a membrane keyboard is usually a pretty safe bet. They are smaller, lighter, far less prone to breaking, and you can use them in public spaces or on transportation without abusing the ears of the people around you.
Related article: Mechanical Keyboard vs Membrane Keyboard
How do Membrane Keyboards Work?
Whereas mechanical keyboards work by having one switch per key which feeds directly into the PCB (printed circuit board) the membrane keyboard makes no such separation. Every keycap sits directly on top of the membrane switch, which sits directly on top of the corresponding PCB connector.
Instead of every switch being separate, as it would with the mechanical keyboard, they are instead all joined together. The membrane sheet holds all of the keys together. You can’t simply take out one switch and swap it for another as you would with a mechanical keyboard.
The membrane is responsible for every key if one part of the membrane should become damaged then the whole thing is damaged.
Another important distinction between how a membrane keyboard works and any others is that the membrane keyboard has no moving parts. The switch is purely a pressure plate that depresses when the key is pushed down, there isn’t an actual switch as there would be with a mechanical keyboard.
Many people still refer to this as a switch when talking about membrane keyboards, as I have because it helps clarify which part of the keyboard you are talking apart. When there is no direct comparison to be made to other keyboards and how they function it’s best to simplify things.
What are Some Problems with a Broken Membrane?
A broken membrane is as inconvenient as a broken switch. If your membrane is broken in such a way that some keys jam, stick, or don’t work at all you end up with a less than fully functioning keyboard. Which simply isn’t acceptable whether you are working or gaming, you can’t get by on a keyboard that doesn’t make use of all of its keys for very long.
The biggest problem with a membrane being broken is that since there is only one membrane and not lots of individual switches if one part of the membrane is broken you will very likely need to replace the whole thing.
This is far more tedious than it would be with a mechanical keyboard, where you could take out the switch and keycap for the problem keys very easily and make replacements. Luckily, membranes aren’t super expensive and can usually be fixed with a bit of patience and a little know-how.
How Does the Membrane get Damaged?
The membrane is surprisingly sturdy, you will have a hard time doing any serious damage to it. The most common problems people have are either spilling a drink on your keyboard or dropping it so that the membrane and PCB become slightly misaligned. Sometimes this affects all keys, sometimes just a couple.
Luckily, the membrane actually works as a very powerful safety feature for the PCB. Since the membrane covers the entire board, it offers some cushioning and even some water resistance. With a mechanical keyboard, there is nothing to cushion the blow from being dropped or to prevent your spilled drink from making its way right into the circuitry rendering your keyboard useless.
The membrane itself is pretty thick and sturdy, but it’s not invincible. The biggest problem comes from the tiny metal traces that flow from key to key, these are what registers the keystroke and allows your key presses to output the computer side. These traces are what end up breaking, or wearing out, or getting water damaged. These are what we will need to fix later on in the article.
Some Simple Ways to Protect your Membrane?
The best way to protect your membrane is to avoiding eating and drinking around your keyboard. Many of us make the bad habit of eating at our desk, we shouldn’t do it but we do anyway for convenience. You can also avoid damage from the buildup of dirt and grime by regularly wiping down the keyboard and using compressed air to clear out any gunk between the keys.
Since the membrane covers the main components, you can find a lot of success with compressed air. Lastly, and more dramatically, you could put a keyboard cover on to help protect all aspects of the keyboard. Personally, keyboard covers are not for me. But they work pretty well for some people. That’s a matter of preference, though.
How to Fix the Membrane on a Keyboard
The only way to fix your membrane keyboard without simply replacing the membrane is to repair the traces between each key. The traces are a thin metal wire conductor that transfers your input to the computer. They flow from every key to the keyboards PCB and from there on to the computer itself.
If you haven’t seen it, it’s very similar to the metal cables that flow between each body part in the board game operation. When you touch a part of the wire, the signal is transferred to the little buzzer at the base of the toy.
These wires are much smaller, thinner, and far more subtle. But still very noticeable. Before you start, you should make note of any key that isn’t working as it should be. Once you have done so, we can begin trying to fix them.
Step-by-step Guide
The first thing we will need to do is gain access to the membrane itself, meaning we need to open up the keyboard. Most membrane keyboards have between 8-16 screws in the base that holds it all together. Remove those and place them in a small bowl so you are less likely to lose any.
Once the keyboard is apart you can begin shifting your way through to the membrane. Remove the section that holds the keys on and set it to one side, we won’t need this half.
When you have the backside in your hand you may find that the membrane is quite hard to remove from on top of the PCB. Sometimes there are clips that hold it in place, but usually, it just needs a gentle pull.
Once you have pried the membrane off the PCB we can flip it over and have a look at the bit we are really interested in. The traces. These traces are what has likely been damaged one way or another.
To fix them, you are going to need something called silver lacquer and a long thin device to spread it. A toothpick would work fine, or an unfolded paper clip. This silver lacquer is highly conducive and can actually bridge the broken conductor trace for you.
Simply spread it out, using your toothpick or other, between the keys that don’t work. It may take some time as you should use the lacquer sparingly. Too much for each connection can lower the current. Once you have done this, it’s time to reassemble the keyboard.
I found some cheap silver lacquer on Amazon. It’s advertised for painting a vehicle, but it can be used for fixing the membrane on a keyboard too. It’s the conduciveness that makes it effective.
Fit the membrane back on to the PCB (make sure you do it the right way around) and then both halves of the keyboard can be fitted back together. Make sure you screw every part of the keyboard together before using it again, or the membrane may come loose against the PCB. If that does happen, just open her back up and refit her.
Conclusion
Hopefully, you now have a much better understanding and are more confident when dealing with your membrane keyboard. The silver lacquer repair method is a very easy one, though it can be a little tedious when you have LOTS of keys to repair.
If this method fails you, it’s a good idea to take your keyboard in to see a professional. The problem is likely with the PCB itself and you simply won’t be able to fix that without being shown how first. Good luck with your broken membrane!