Much like the debate over a wireless vs wired keyboard, the debate over whether a desktop computer or a laptop is better has been an ongoing war with no end. Desktops are much more powerful and you can get a better bang for your buck. Whereas laptops have that portability feature which is a must-have for some people. However, a major drawback to the laptop is the fact that the keyboard is attached to the device.
With a desktop setup, it’s fairly easy to replace a keyboard. You just disconnect it and connect the new one via Bluetooth or wire. However, with laptops, it’s a little more complicated than that.
People ask this question a lot: Is it possible to replace a laptop keyboard? The answer is yes! It’s definitely possible to replace the keyboard on most laptops, however, some keyboards are easier to replace than others depending on the laptop. That being said, I obviously don’t know the exact keyboard you are using but I will do my best to give a general guide for replacing a broken keyboard on any laptop.
Table of Contents
Check on Compatibility
Compatibility is very important when you are installing a keyboard on your laptop. Keyboards vary from one particular laptop brand to another. So, you should make sure that you understand your laptop before purchasing a new keyboard.
For example, if you are using a Dell laptop, it’s vital to get a keyboard that is compatible with Dell. If you get one that is not compatible with your laptop, there is a likelihood that you will encounter problems as you install it and after installation. The functionality of the keyboard will be affected to a large extent.
For instance, you can check if the screw holding case is the same as the one you are replacing. If you are not sure about this, you can inquire from a laptop vendor to assist you accordingly.
Tools Needed to Replace Laptop Keyboard
It’s pivotal to mention that installing a keyboard on a laptop can be a challenging task, depending on your experience. You might find it unproblematic to install a new keyboard on a desktop or console however, it’s not the same case with a laptop. Having the right tools will ensure that everything goes right when you begin the job. Keep in mind, after dismantling, you will need to put everything back correctly, so you should have the right tools before you begin.
The following tools are the minimum needed to replace a laptop keyboard;
- Driver: Depending on your laptop you may need a specific screwdriver. Take a look at the back of your keyboard and see whether you need a Phillips head, Flathead, Star head, or some other type of driver.
- Pry tool: You will need a pry tool to get underneath the keyboard and also to remove the ribbon cable from the zip connector.
- Container: This is optional however, it could be useful to prevent losing any small objects such as the screws.
- New keyboard: last but not least you will need a new keyboard for the model of laptop that you are using. Each laptop may have a different size or shape so you will need to make sure you get the right one.
Steps to Replace Laptop Keyboard
Before you begin, a good point to take note as you dismantle the different parts is to take photos of them so that you remember where each part was when you assemble them back. This is extremely important if you are not very familiar with the process.
- Remove the Battery: The first step is to turn off your laptop and remove the battery. The battery is located at the bottom of your laptop.
- Remove screws on the back: Once you have removed the battery, there will be screws that you will have to remove at the panel underneath your laptop. The panel varies in shape depending on the brand and model of a laptop. After you have found the screws, remove them gently and put them in a safe place, preferably in a small container so that they don’t get lost. They are very essential components of your laptop, so make sure they are handled well.
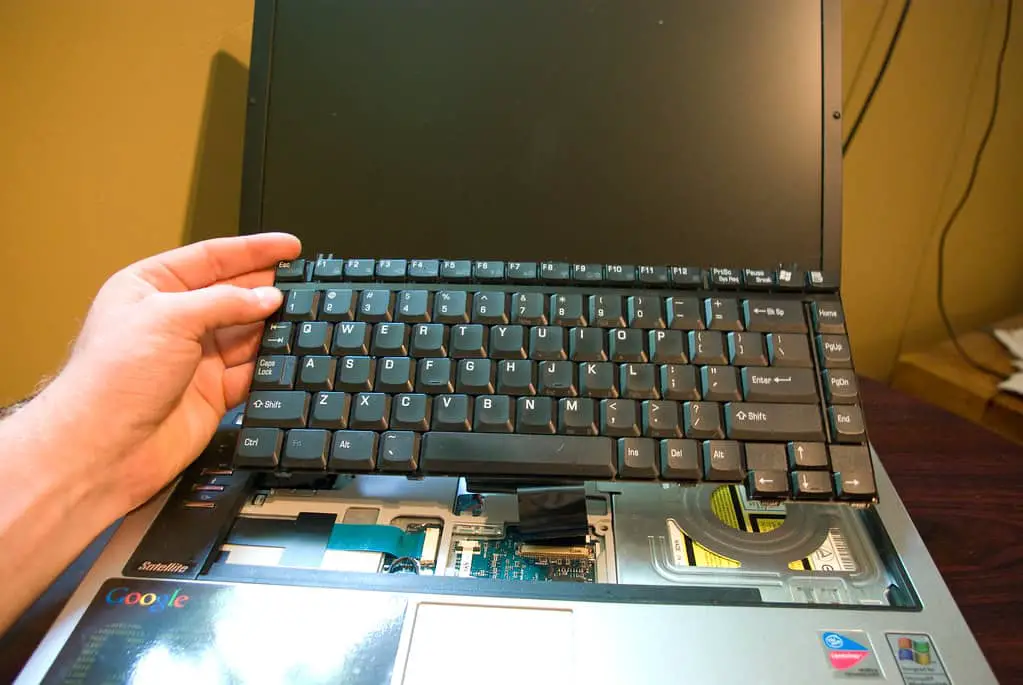
- Pry the keyboard: Once you remove the screws flip the laptop back over. Insert the pry tool around the top and sides of the keyboard. Put a small amount of force in order to remove the tabs, but be careful not to put too much force and break the keyboard or the tabs.
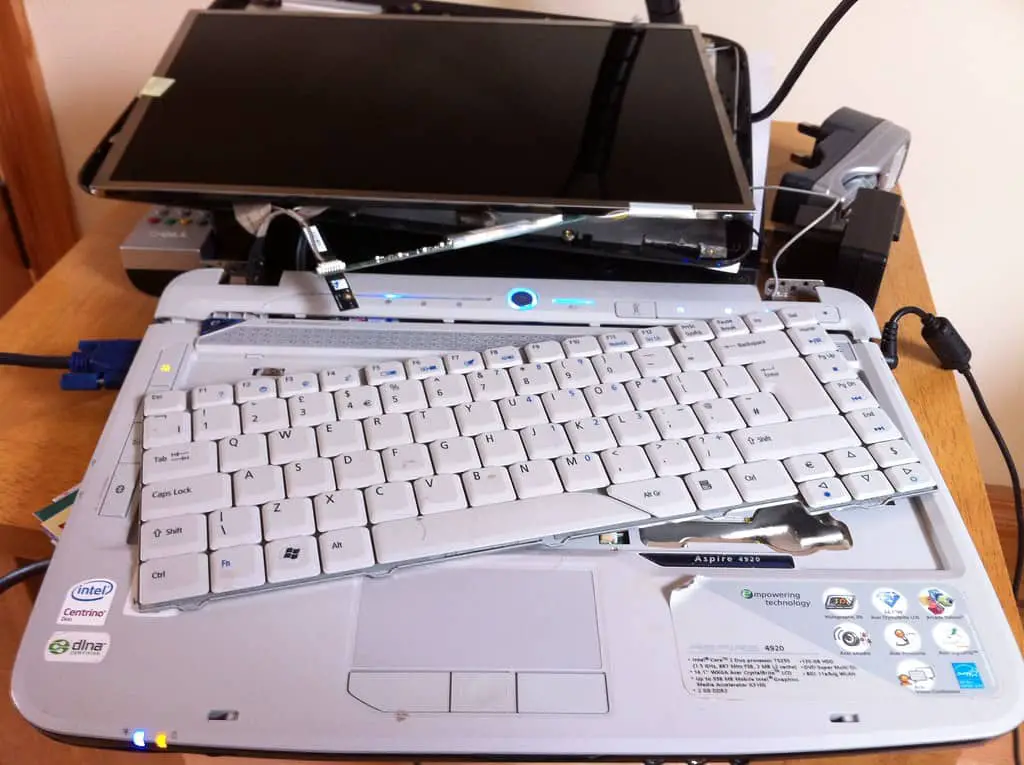
- Slide it up: Once the keyboard has been pried from the laptop and the tabs are no longer inserted, you can now slide the keyboard up. The keyboard will be free from the laptop other than the ribbon cable which will need to be disconnected.
- Ribbon cable: Remove the ribbon cable from the zero incision force (ZIF) connector, located on the motherboard. Be very careful when you’re doing this step. You don’t want to damage the cable or the connector.
Remember, the components of a laptop are sensitive so you have to be extra careful as you handle them to avoid any damages. After removing the existing keyboard, it’s now time to replace it with the new one.
How to Connect the new Laptop keyboard:
This part is pretty simple. Just take the steps and do them backward:
- Connect the ribbon cable of the new keyboard into the ZIF connector, located on the laptops motherboard.
- Slide the bottom of the keyboard into the laptop keyboard slot.
- Pop the tabs back in place.
- Flipped the laptop around and put the screws back where they go.
- Put the battery back in and boot it up!
Things to Avoid While Replacing the Laptop Keyboard
In the event that the keyboard doesn’t function as expected, it means that something is wrong. It could either be that the installation process wasn’t done properly or the keyboard is defective. That is why it’s vital for you to ensure that you get the right backlit keyboard.
You can try the process all over again or take your laptop to an expert to see where the problem is and install it for you, if necessary. In this section, I will go over a couple of things you may want to be careful about so that things go smoothly.
Misplacing the screws:
The first and most obvious thing that you want to make sure is that you don’t misplace your screws. This could be a major inconvenience and depending on your laptop, you may have to order screws from the manufacturer. However, most likely you can get the same screws from any hardware store. Still, it’s best to just avoid being in this situation by putting your screws in a container from the beginning.
Loose screws:
On the topic of screws, just as important as losing your screws, you also want to make sure that you don’t have any loose screws. If the screws are not tightened all the way they could end up falling out and then you will be in the same predicament as the first scenario.
Over tighten:
In the same way that you don’t want your screws to be too loose, you also don’t want them to be too tight. You may strip the screw or even crack the laptop.
Too much force:
When prying the tabs on the keyboard or disconnecting the ribbon cord from the ZIF connector you want to be careful that you don’t apply too much force. Doing this may cause unwanted damage to the laptop.
Secure key tabs to avoid bulging or sagging:
The last thing to check is that the key tabs are in place. If they are not correct there may be a weird bulge in the keyboard or some other problems.
Don’t Want to Read? Watch a Video!
Conclusion
Replacing the keyboard on a laptop is actually a lot easier than you may think. With a few simple tools and about 10 minutes of your time, you can have a brand new keyboard on your laptop.
After a successful installation, and everything is good to go, you can now enjoy the benefits of a brand new keyboard.
Hopefully, this short article saves you time and money. Now you can do this on your own and don’t have to hire a “professional”. Having your laptop repaired by a “professional” can be very expensive. Also, who wants to drive all the way to the store and wait an hour or so in line when it’s so easy to do yourself!