Whether you want the opportunity to express yourself or are just looking to spruce up your old keyboard a little, giving it a fresh coat of paint might be the way to go. Painting your keyboard can be a lot of fun, the result is excellent, of course, but the journey there can be equally as enjoyable.
If you aren’t the most confident painter or aren’t even sure that you are going to be able to get the job done, have no fear! This helpful article is here! Here you will find everything you need to know about painting your keyboard, and how to do it safely. Safe for you, and safe for the keyboard itself.
At the end of the article, there are even some design ideas if you are not the most creatively minded person.
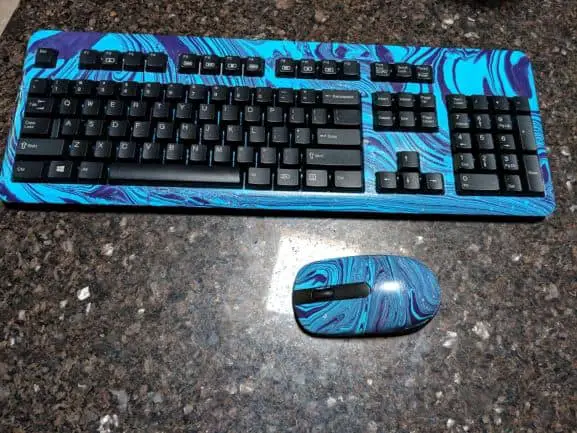
Image By: u/virusburger101
This post contains affiliate links
Table of Contents
Why might you want to paint your mechanical keyboard?
Painting your keyboard is an excellent way of showing who you are and what you are interested in. Having a themed keyboard is a good way of doing such a thing.
A touch of paint can also help hide any blemishes that you might have, from a life of being knocked around and heavy use. We all grow attached to that one keyboard that we’ve had for ages. It has started to get a little worn out, but it still sees a fairly decent amount of use. Why not breathe some new life into it, rather than throwing it away.
You could always pay someone to do it for you, but wheres the fun in that? Doing it yourself isn’t particularly difficult, and is far more satisfying. Besides, it might end up saving you the big bucks that a professional will surely charge.
Can you paint a mechanical keyboard?
Before we get into the details of painting the keyboard it is important to briefly cover whether or not you even can paint one. The answer is, of course, yes. You can indeed paint a mechanical keyboard. But you can’t just use any paint and you cant do so without first learning to take the keyboard apart safely. All the while being able to put it back again unless of course, you plan on using it as a paperweight.
It is also important to understand the limitations of painting on your keyboard. If you were hoping to paint some sort of Bob Ross Esque painting you might be a little disappointed. Keyboards generally don’t make the best canvas for intricate paintings.
Besides, the biggest “canvas” the keyboard offers you is the back of the keyboard in most cases. So your artwork may go unnoticed. This might be a good thing if you are like me and can’t paint or draw to save your life!
What sort of paints do you need to paint your keyboard?
The best paints to use are generally acrylic paints that are going to hold on to the surface well. Acrylic paints are not ordinarily that great for plastics, and your keyboard is likely made of plastic.

That being said, when you first use a primer you are likely to find you get pretty good results compared to other paints. Priming is needed for your keyboard anyway because the surface is generally not all that smooth, and is likely designed to stop liquid sticking to it.

Acrylic paint without a primer would slide right off more or less. Since keyboards are also often slightly textured rather than silky smooth, without priming you are going to find that you get a very uneven coat.
If you really want to get fancy, maybe try using some paint pens. It makes it a whole lot easier to create the custom designs you want. They are less messy then a standard brush and I find them to be very precise as well.

Lastly, most keyboards are black. If you were to try and paint with bright colors on a black background it won’t turn out very well. Unless you were planning on painting a night sky or a solar system, in which case it might look cool as hell!
Some common pitfalls to watch out for?
The biggest problem people fail to consider is that paint can and will ruin your keyboard. If you get even a little bit of paint on the circuit board, especially around the soldering, it could trash the PCB. You trash your PCB, then your keyboard is an expensive oversized paperweight.
Taking the keyboard apart beforehand is the best way to approach the situation. Besides, that will make it easier for you to paint the more finicky bits anyway. Many people forget that it takes a few coats of paint to get a good finish, many people do just one or two and then give up assuming they will never get anywhere.
Lastly, keyboards are electronic components. You never want to mix electronic components with water, or any liquids, which paint surely is. Make sure the keyboard is unplugged and AWAY from the computer. Seriously, do it in a different room.
How to paint a mechanical keyboard
Painting the keyboard isn’t all that complicated, thankfully. The biggest difficulty is, first, having the artistic talent to paint the keyboard well. And second, being capable of carefully taking the keyboard apart. Luckily for you, we are going to go over that last bit now. But, not much that can be done about the first one sadly.
So, to paint your keyboard you will first want to take it apart. Keyboards are, for simplicity purposes, made up of two halves. The backboard and the front, The front being the section that fits on top of and around the keys. Most keyboards are only held in place by between 4 and 8 small screws, that can be easily found on the back.
Once you have taken out the screws, set them aside in a small bowl so you don’t lose them. Now you will have the front half of the frame off and ready to be painted. There isn’t an awful lot of surface area to work with here, so its best to just paint it a color that somewhat matches whatever theme you are going for. There may be some room at the bottom right of the keyboard for you to paint a small character or symbol, it depends on the size and shape of the keyboard.
Setting the top half aside, its now time to take off the keycaps. As you will want to paint those two, but don’t want to do it when they are still on the keyboard. The back of the frame can be painted by just flipping it over. There is no real difficulty here.
The actual painting is easy enough. First, cover the entire frame (the parts you want to paint) with a layer of primer. Primer is almost always white, so you might need two coats before it starts to thicken up a bit. Then leave it to dry.
Once dried it makes a great base for your next layer, which will be your colored paint. Using a small brush do your best to neatly create whatever design you had in mind. Make sure you use a small brush with a tiny amount of paint on it. If you use big blobs of paint, it will run and might make its way into the keyboard and damage it.
The key caps would also appreciate a layer of primer. Make sure you only prime and paint the TOP of the keycaps. If you pain the inside, then they will stick. A mechanical keyboard with sticky keys is not a pretty sight. It is best to avoid that as best as you can.
Once you have painted your keyboard and left it to dry, its time to put it back together using those same screws you took out. Remember to put the keycaps in first. And do make sure everything is completely dry. Many people fail to give the paint enough time to dry. A full 24 hours would be plenty, its best to stay on the safe side.
Some cool design ideas
If you aren’t the most creative person, then you might want to stick with just a plain color all over the keyboard. Which is fine! It can work out pretty great, coincidentally. Making your keyboard a pastel color looks pretty cool, especially if you have a neutral-colored room or office.
Pale blues and purples would like nice and professional. Or, you could take this opportunity to make your keyboard bright and bold. Rich yellows and sunset oranges, make your keyboard stand out. If you are lucky enough to have some artistic talent, the world is your oyster.
From personal experience, a friend of mine had a pale grey keyboard that they painted small trees on each of the keys, some had flowers, some had leaves. The sides of the keyboard were covered in vines and with a green RGB backlight, it looked awesome.
You can do anything and everything you want, your only limit is space and your imagination.
Conclusion
Hopefully, you now feel confident to go out and paint your run down, worn out, keyboard. A fresh coat of paint is all your keyboard needs to look as good as new. It can look great in your gaming room, or make the dull office setting a little more interesting. It also offers you a good opportunity to clean the keyboard, since it has already been opened. There are several good articles on this site to help you do just that! *Link article here*. Good luck and happy painting!