
Rubber dome switches can offer great feedback at lower prices than mechanical switches. But in case of breakage, replacing or fixing the keyboard rubber dome can be a bit of a task for most people. As a result, most users end up replacing their keyboards when something like this happens.
If you are wondering how to fix or replace your keyboard rubber dome instead of having to get a new keyboard, you have come to the right place.
In this article, I will talk about rubber dome switches, how they work and how they are structured. I’m also going to explain the process of replacing these switches and fixing them when needed. So, you’re going to learn all you need to know. Without further ado, let’s get started.
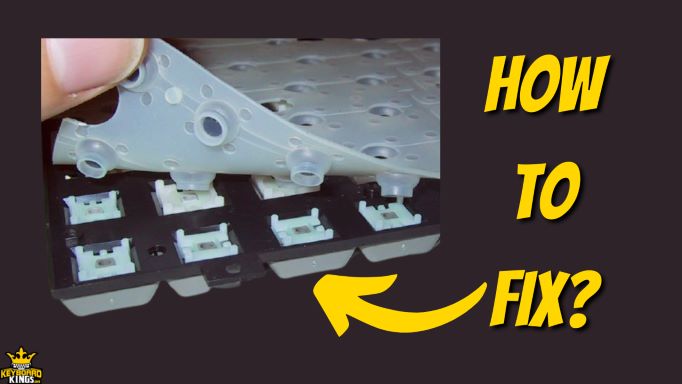
Table of Contents
What are Rubber Dome Switches?
Rubber dome switches are a switch technology used in keyboards that utilize collapsible rubber domes for each which are used to provide tactility and resistance on pressing.
These switches or bumps are placed on a rubber sheet and use the same mechanism as membrane switches as there aren’t individual key switches, rather there is a complete rubber sheet that has many small collapsible bumps on it.
Rubber domes aren’t as expensive as mechanical key switches since they don’t require as many components so, that’s why keyboards with rubber dome switches are fairly cheaper than mechanical keyboards.
If you take a look around the market, you’re going to see that rubber dome keyboards are much easier to find. That’s why they’re very popular among general computer users. Rubber dome switches are pretty effective in delivering tactility and you should use them for yourself to find out.
Structure and Working of a Rubber Dome Switch
Before we learn how to remove or replace rubber dome switches, it is essential to know how exactly do rubber dome switches look and work. Actually, in terms of variety and structure, rubber dome switches can differ since there are more than a single type of rubber dome switch. Let’s take a look at them.
Plain Rubber Dome
This is the original variant of rubber dome switches. There are simply collapsible domes on the surface of a rubber sheet that provides tactility and feedback when the key over them is pressed. They’re the most common in modern keyboards in use.
Multiple Sheet Rubber Dome Switches
Some companies achieve better tactility results and save replacement costs for the user by using multiple smaller rubber sheets in their keyboards. This way, one keyboard has multiple small rubber domes that are located on different sheets that can be replaced instead of the whole sheet becoming obsolete which is pretty cool.
Dome with Slider
Each of the rubber domes has its own slider which makes the dome with slider switches more tactile and mechanical-feeling. These switches aren’t very common anymore but Topre switches are made with this style. You can use mechanical keycaps on these switches or use these keyboard keycaps on mechanical keyboards if you want to.
Scissor-Style Switches
The thing about rubber dome switches was that they required a larger keycap profile to be as tactile as they were. This problem was solved using the scissor-styled switches. With the scissor mechanism, there is a switch structure over the dome which allowed the same tactile feel even for low-profile small keycaps with a shorter travel distance. However, scissor-styled switch keyboards are much more expensive than regular ones.
Pros and Cons of Rubber Dome Switches
Rubber dome switches offer a lot of benefits, but in comparison to mechanical switches, there are a few disadvantages as well that come with them. Before you think of buying a rubber dome switch keyboard, make sure you check out these pros and cons.
| Pros | Cons |
|---|---|
| High Tactility – If we talk about the tactile feedback that rubber dome switches provide, it is quite good. The feel is crisp and due to the built-in collapsible design of the domes, the feel is very natural which makes the clicking experience pretty decent. | Not as premium as Mechanical switches – The one thing that I don’t like about rubber dome switches is that they aren’t as tactile or premium in quality in comparison to mechanical switches nowadays. The overall feel is less clicky which brings them in the shadow of modern high-quality mechanical switches between lesser feedback. |
| Longevity – Rubber sheets are very flexible if we compare them to spring switches or the mechanical switches of modern times. This is why if we talk about the durability and longevity of rubber dome keyboard switches, it is right up there at the top and will last you quite a long time to come. | Not many tactility options – Another problem with rubber dome switches is that they don’t have many options to choose from. In mechanical switches, you can choose between tactile, clicky, linear, and so on but rubber dome switches do not offer this kind of choice which can be problematic for some keyboard users and therefore is a bummer, unfortunately. |
| Price – The rubber sheets used in rubber dome keyboard switches are produced on a much larger scale as compared to mechanical switches. This as well as the lower requirement of components is what makes rubber-dome switches less expensive as compared to other kinds of switches. |
How to Replace Keyboard Rubber Dome | A Step-By-Step Guide
If you have a keyboard with rubber dome switches and you’re thinking of replacing the rubber dome because it isn’t working on more than a few keys, then you’re lucky because I’ve made a step-by-step replacement guide for you. Make sure you follow all the steps perfectly. Let’s take a look.
Step 1: Gather Equipment
If you want to take matters into your own hands, you’re going to have to gather equipment for the process. Replacing a keyboard will require a few things that you’ll need to have on your side.
To make sure you don’t stop within the replacement process, you’re going to need your keyboard, a cleaning brush, a screwdriver, and a keycap remover. All of these things will help you through this process of rubber dome replacement. So, getting these things arranged before would be quite helpful.
Step 2: Remove the Frame
The second step for the replacement of the keyboard rubber sheet is the removal of the keyboard frame. You’re going to take the screwdriver and make sure you know where the screws of the keyboard frame are.
Now you’re going to unscrew all of the keyboard screws one by one. After unscrewing all the screws, you’re going to take the frame of the keyboard off. Then you’re also going to make sure that the keycaps are completely off so that the rubber dome switches are completely accessible and in plain sight.
Step 3: Take the Rubber Dome sheet out
With the help of the cleaning brush, you’re going to start cleaning the rubber dome sheet so that you can see where the problems existed. If you believe that it isn’t fixable, you’re going to want to take the rubber sheet out.
If your keyboard doesn’t have any excessive varieties of rubber sheets within it, you can simply take the rubber dome switches off altogether without any excessive force. You can put this rubber sheet in a recycling bin if you want to after you’ve taken it out.
Step 4: Replace with a New Rubber Sheet
Getting a new rubber sheet for your rubber dome keyboard isn’t as hard as you might think. In fact, you can get a good rubber sheet for much less than you might get new mechanical switches for a mechanical keyboard. So, instead of throwing your keyboard away, get a new rubber sheet.
Now the installation process isn’t as difficult as you’d think. You’re going to place the new rubber sheet right onto the keyboard frame the way you took the older one off. This will allow you to simply place all the keycaps back onto the keyboard and continue with the frame.
Step 5: Use Your Keyboard
Now that you’re done replacing the rubber dome, simply take your keyboard and plug it back into the computer. You’re going to simply check the new rubber dome out.
For this, you’re going to press all the keys on the keyboard and make sure that none of the keyboard’s keys are double typing or not typing at all. That’s all you’re going to need to do to replace your rubber domes and save a bunch of money.
How to Fix Rubber Dome Switches in a Keyboard
So, the problem isn’t with your rubber dome sheet entirely but only a couple of domes on the sheet; Well, there’s a simple fix for that so you don’t have to take the keyboard apart and replace the rubber sheet completely. Let’s take a look at this process.
Step 1: Remove the Keycaps
The first order of the fix is going to be the removal of the keycaps. You’re going to make sure that you take the keycaps off gently so that they don’t break off because you’ll only increase your problems by doing that.
Ideally, use a keycap puller. But if you don’t have that, you can use tweezers or even use something like a screwdriver to unhinge the clamp of the keycaps and taken them off the right way.
Step 2: Turn the Dome Upright
It is possible that the dome under the keycaps isn’t completely broken off and still isn’t working. If that’s the case, then we can surely fix the problem. What you’re going to basically do in this case is that you’re going to take the dome and make sure you bring it to an upright position.
That is, only if the dome is bent or cracked. Otherwise, you won’t be able to fix it and you’re going to have to replace the rubber dome which can be a bit more costly.
Step 3: Use Instant Glue
It is now time to use instant glue. You might be skeptical as to how instant glue is going to work in this case but trust me on this. All you need to do is take an instant glue bottle with a short tip.
Then you’re going to place the instant glue over the dome’s end which seems cracked or bent, and then simply place a bit of the instant glue there and leave the keyboard out for about 30 or so minutes until the glue has completely hardened.
Step 4: Place the Keycap on
We’re almost at the end of the fixing process. You’re going to basically take the keycap and make sure that you know how the clamps and hinges work. Now take the keycap and place it back onto the switch and after that, put the hinges back into place by pushing the keycap onto the switch and you’re practically done.
Step 5: Use Your Fixed Keyboard
After doing that, you’re going to want to test your fixed keyboard out. This is the moment of truth. If the keyboard passes this test, then you’ve successfully fixed your keyboard.
Plug the keyboard into the computer and just sit down to test the key that was causing issues. If it presses well and types fine, you’ve done your job. You’re going to be able to play games, surf the internet, and use the computer in all kinds of ways once you’ve fixed the keyboard.
Conclusion
You don’t always have to replace your rubber dome keyboard when it breaks or stops working. If you want to save some money, you can fix the dome or replace only the rubber sheet with the aforementioned techniques and a step-by-step guide.
I assure you that you’re going to have a working and decent keyboard at the end of the process. I hope you learned a lot from this article and that you’re going to use these techniques and methods to deal with your keyboard’s rubber dome problems.