
If you’re a keyboard enthusiast who loves to learn more about keyboards, learning about proper finger positioning on a keyboard would definitely make you super-excited because it will make your keyboarding experience all the more productive once you learn it.
You might be wondering, what is the Proper Keyboard Finger Positioning technique, and how do I use it? Well, that’s what I’m here to tell you.
In this article, I’m going to talk to you about Proper Keyboard Finger Positioning, why it is important, problems you can face if you don’t use it, standard techniques people use, and how you can master the proper keyboard finger positioning technique yourself to become a better keyboard user. So, without wasting any time whatsoever, let’s get started.
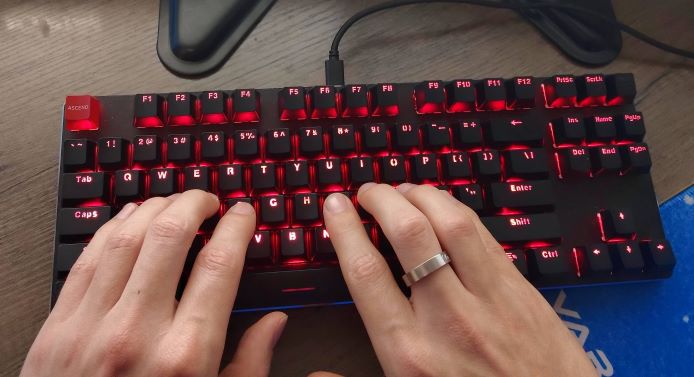
Table of Contents
What is Proper Keyboard Finger Positioning?
Like every device, a keyboard also has a proper technique that allows the user to use it the best way, offering the most productivity and causing the least amount of strain. This particular way or technique of using a keyboard is known as proper keyboard finger positioning.
Many people worldwide are unfamiliar with this concept, and they believe that any stress or strain that they get from a keyboard is natural. However, that’s not the case. If a proper finger position were to be adopted, there would be no strain on the muscles or wrists of the user.
If more keyboard users adopt the proper keyboard finger position, device-induced problems wouldn’t exist. So, you need to remember that you need to try this position out and see the differences. You’ll surely be stunned by them.
What Finger Positioning Do People Usually Use?
You must be wondering, what position is considered standard and which one is commonly used by keyboard users who do not know how to place their fingers on a keyboard properly? Well, there’s no one common way of using the keyboard if you’re not aware of exactly how to place your fingers.
Many people end up keeping their fingers away from the keyboard when they’re using it. Some keep their left hand on the WASD keys while their right hand is on the arrow keys, and some people can’t type without looking at each character which can make typing very uncomfortable and a job that you’d look for an out of.
All these methods have some problems associated with them. But ultimately, they’re all uncomfortable and can lead to problems that you might not see coming yet. For example, if you want to test out your way of typing, you can close your eyes and try to type sentences blindly. If you’re unable to do so or don’t even get a single word right, your typing position is incorrect. And the sooner you fix it, the better for your keyboarding experience.
The 10-Finger Keyboard Positioning Technique
The best finger positioning technique for placing your fingers on the keyboard is the 10-finger keyboard positioning technique. In this technique, what you’re going to do is you’re going to place each of your 10 fingers on a key on the keyboard.
The fingers will be placed on the A, S, D, F, and J, K, L keys along with the spacebar key. If you’re concerned about how the placement of the fingers would go, let’s take a look at it.
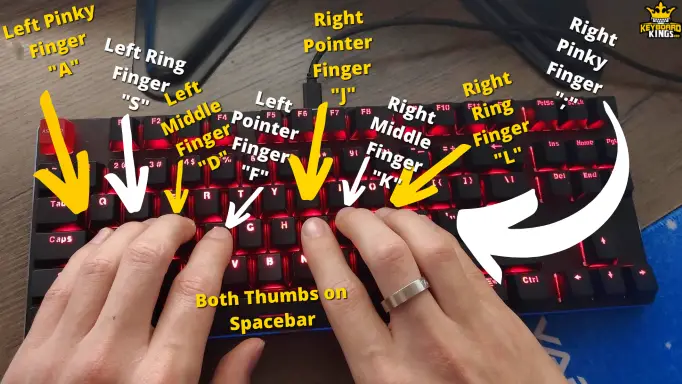
Left-hand Placement
- The pinky finger of the left hand would go on the A key.
- The ring finger would go on the S key.
- The middle finger would be placed on the D key.
- The index finger will be on the F key.
- The thumb would be placed on the left side of the spacebar.
Right-hand Placement
- The index finger will be placed on the J key.
- The middle finger would go on the K key.
- You’ll place the ring finger on the L key.
- The pinky will go on the; key.
- And finally, you’re going to place the thumb on the right side of the spacebar.
The way this finger positioning helps your keyboarding experience out is that each of the fingers placed on the fixed keys will get to that particular commonly used key efficiently and get to the neighboring keys very quickly, essentially making your computer usage quite effective.
| Finger | Placement | Used for |
|---|---|---|
| Left Pinky | A | A, Z, Q, Left Ctrl, Left Shift, Caps Lock, 1, Tab, ~, Esc |
| Left Ring | S | S, W, X, 2, Left Alt |
| Left Middle | D | D, E, C, 3, 4 |
| Left Pointer | F | F, R, V, 5, 6, T, G, B |
| Left Thumb | Space | Space, Left Alt, Win |
| Right Thumb | Space | Space, Right Alt, Fn |
| Right Pointer | J | J, H, Y, B, U, N, 7, 8 |
| Right Middle | K | K, I, M, 8, 9 |
| Right Ring | L | L, O, <, Right Alt, 0 |
| Right Pinky | ; | ;, P, >, Right Ctrl, Right Shift, +, -, Backspace, Delete, Enter, arrow keys |
What Other Keys Can You Press With the 10-Finger Position?
If you’re wondering what other keys you can easily press using the 10-finger keyboard position and how exactly it benefits you over the standard position you go for, you’re lucky because I’ve made a list of the additional keys you can press with this technique. So let’s take a look at it right now.
Keys Left Pinky Finger Can Press in Addition to A

A lot of the important function keys on the left side are in control of the left pinky. In addition to the A key, it is also responsible for pressing the following keys:
Z, Q, Left Ctrl, Left Shift, Caps Lock, 1, Tab, ~, And Even Esc at times
Keys Left Ring Finger can Press in Addition to S
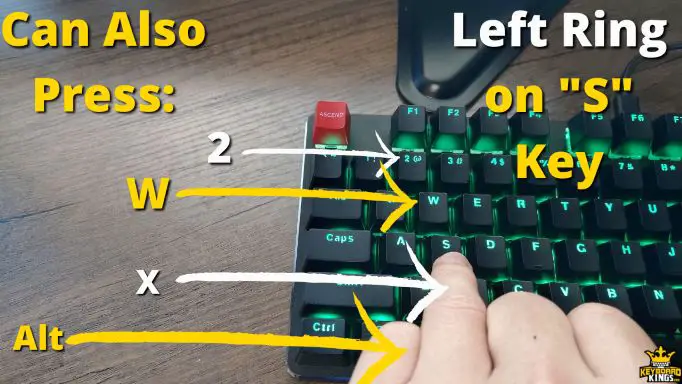
The ring finger on the left-hand controls the letter keys, which are needed for important typing. Here are the additional keys it presses:
W, X, 2, Left Alt.
Keys Left Middle Finger can Press in Addition to D
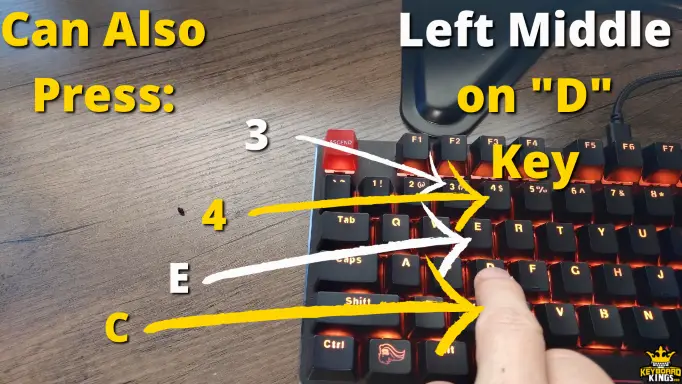
With the middle finger, the frequency of keys is similar to the ring finger, but the importance of the keys is much more. So let’s take a look at them.
E, C, 3, 4.
Keys Left Pointer Finger can Press in Addition to F
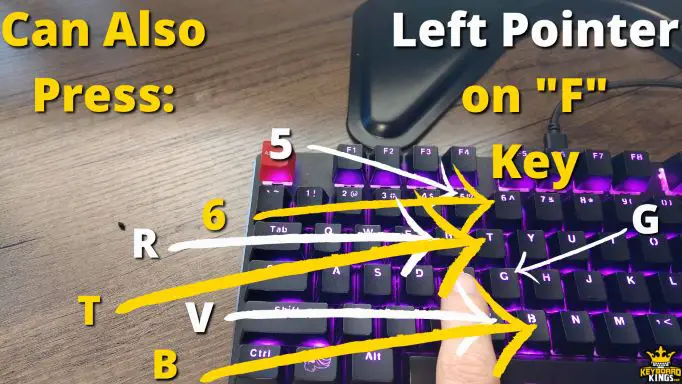
The index finger, which is placed on the F key, has many workloads, but it can manage well due to its free position. Here are the keys you’ll press with this finger:
R, V, 5, 6, T, G, B.
Keys You can Press in Addition to Spacebar with Left thumb.
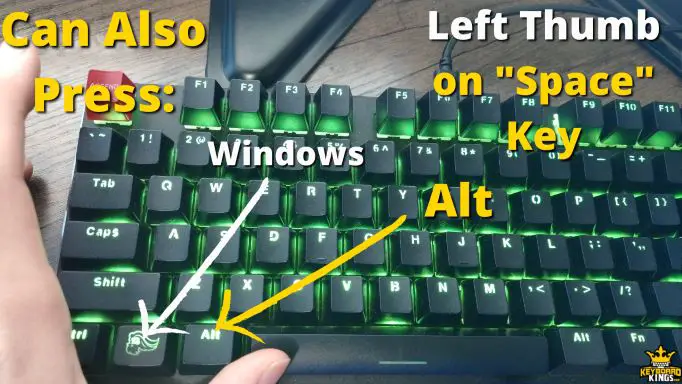
The left thumb is responsible for pressing the spacebar and not many other keys. If you’re on windows, it will be used to press the Windows key at times.
Keys Right Pointer Finge can Press in Addition to J
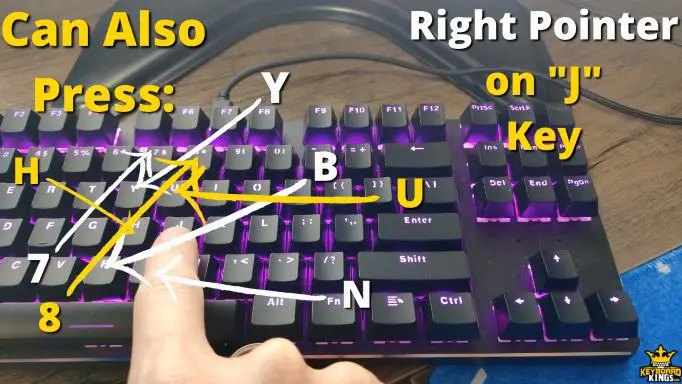
If we talk about the ring finger,r which is on the J key, as the ring finger of the left hand, there are a lot of additional keys that can be reached easily. Here they are:
H, Y, B, U, N, 7, 8.
Keys Right Middle Finger can Press in Addition to K
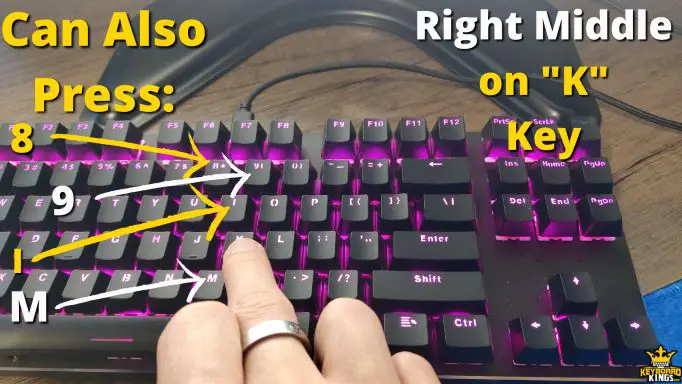
So, you’re holding the K key with your middle finger; Here are the additional keys you’ll hold with it.
I, M, 8, 9.
Keys Right Ring Finger can Press in Addition to L
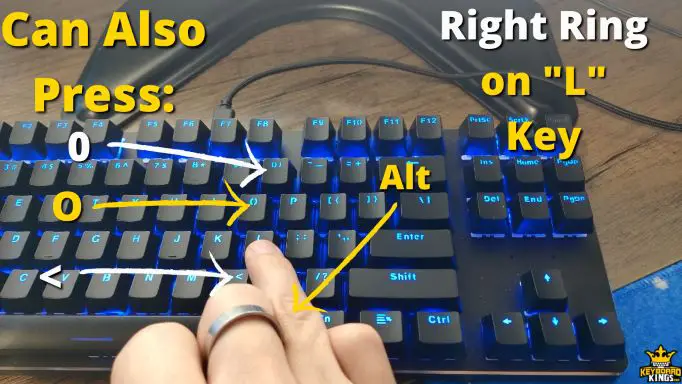
Placing the ring finger on the L key is pretty beneficial. Here are the keys you’ll be able to reach with it:
O, <, Right Alt, 0.
Keys Right Pinky Finger can Press in Addition to ;
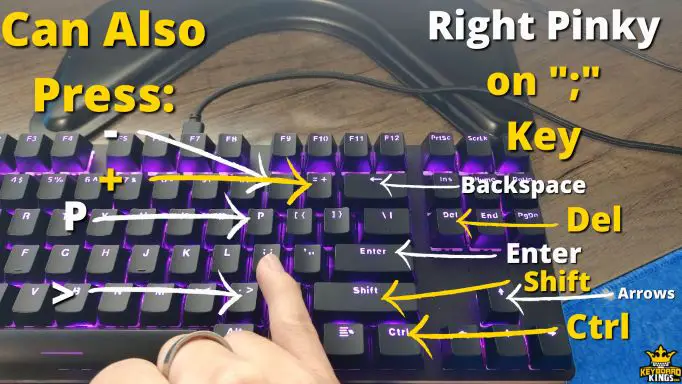
With the pinky finger of the right hand, you’re going to be able to get to a bunch of keys. Let’s take a look at them.
P, >, Right Ctrl, Right Shift, +, -, Backspace, Delete, Enter, and even the arrow keys.
Keys You can Press in Addition to Spacebar with the Right Thumb
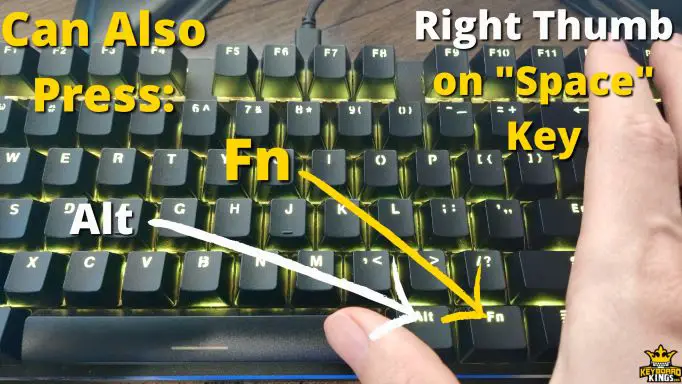
The right thumb is usually used to hold the right side of the spacebar and no other keys, but you can use it to divide the keys of the right pinky to reduce the workload.
Typing Tips for Beginners Using the 10-Finger Positioning Technique
If you’re thinking of starting utilizing the 10-finger positioning technique for using your keyboard, it is high time for you to adopt a few other healthy changes and tips for your computer experience as well. So let’s take a look at some of the important typing tips and tricks you should follow.
- Better Posture – First of all, making sure that you keep your posture upright, shoulders calm, and sit on a chair with your arms at a good distance from the keyboard is important. These practices will help you type better as well.
- Ergonomic Keyboard – Next, using an ergonomic keyboard that supports the 10-finger placement technique is also a great trick to help you get used to the technique quickly and easily.
- Wrist Positioning – Last but not least, you need to make sure your wrist position isn’t bent and is completely straight as you’re using the keyboard. All these tricks will make your keyboarding experience much better.
Why is Proper Positioning Important?
A lot of you may be wondering, “We’re already cool with our finger positioning style on our keyboards; why do we need to go for your so-called proper positioning technique?”. Well, it’s a fair question. So let me explain it to you using a proper example. In today’s digital age, the world revolves around the internet, global networks, and virtual communication. In this digital age, approximately 15 of your 24 hours end up being consumed by electronics and especially computers.
In fact, if you’re a gamer or someone who communicates with their friends over the internet, too, then make this span of time even larger. So simply what I want to say is that a huge chunk of our daily lives gets spent in front of the computer typing away at the keyboard.
If during this span we end up choosing to use a keyboard in its proper manner, placing our fingers at the right spots that increase our overall productivity, reduces our span of time in front of a screen, and also saves us from potential health problems in the future, then why shouldn’t we?
That’s why using a proper finger positioning technique is crucial if you want to become a better and more efficient keyboard user who knows what they’re doing. It is more of a matter of personal choice though, you can still choose to use your own technique, but over time, you may come to regret it.
Problems You Can face If You Don’t Adopt Proper Keyboard Positioning.
Since we’re on the topic of what could happen if you don’t use a proper keyboard positioning technique, it would be good to learn about the possible problems you might face. Let’s take a look at some issues bad finger positioning can cause in users.
- Reduced Productivity – The thing about most people is that they consider themselves very productive without any practice or knowledge of the concept. A person is only as productive as much as they’re willing to adapt to changes around them. That includes keyboard finger positioning. If you don’t use the right positioning, you will get less work done in a long time.
- Inability to do long-term work – When you’re using the wrong finger positioning technique and using your keyboard, you won’t be able to sit for long periods of time in front of the computer and type because of how exhausting, and unnatural your typing position is will be. It might even cause you pain to work like that.
- Future health concerns – Many people don’t know this, but the wrong techniques of using keyboards can even lead to long-term health concerns. The muscles and joints of keyboard users and professionals who spend a lot of time on their computer desk can wear out over time and get diseases like bone damage, carpal tunnel syndrome, weak joints, etc.
- Stressed Mind – If you’re constantly in a struggle with yourself and you can’t realize what is actually causing you the discomfort and pain you’re suffering, your mind won’t be able to focus and will just end up being stressed out about your condition. This is how the wrong keyboard finger position can stress your mind more than it is comfortable with.
Conclusion
Many people ask why proper finger positioning is important in typing. With the help of proper keyboard finger positioning, you can make your keyboarding experience quite productive and efficient. Moreover, you can also reduce the risks of potential injuries. So, make sure you adopt the 10-finger keyboard positioning technique and use it to help yourself get better at keyboarding. May you have a great day and life ahead of you!